 Custom Printed Apparel
 Custom DTF Apparel
 Embroidered Apparel
 Full Service Customization
 Rhinestone Apparel
 Sublimated Apparel
 Custom Drinkware/Photo Panels
 Siser Sanmar Decoration
 Seasonal Items
 DTF Transfers
 Supacolor Transfers
 Sublimation Transfers
 HTV Transfers
 Custom Patches
 Custom Stickers
 Artwork & Services
 Twill Transfers

Top 5 Mistakes to Avoid When Working with HTV
Posted by Ian Potter - Snip to It on Sep 21st 2023
Heat transfer vinyl is a versatile and easy way to decorate a wide range of apparel and crafts, but there are some key ways your project can get messed up, even if you think you’ve got everything locked down.
So, here’s a list of common mistakes that people make when working with HTV, and how you can save time, money and your sanity on projects by taking simple steps to avoid these pitfalls.
(I have personally made nearly every mistake on this list as I learned how to use HTV, so there’s no need to beat yourself up)
#1. Not following manufacturer instructions for the HTV
There is no one size fits all set of instructions for a style of HTV. Each type of vinyl from every brand has a unique set of application instructions. Reading and following the manufacturer’s guidelines is the most basic and most important thing you can do for success with HTV.
Temperature, time, and pressure all matter when bonding HTV to your blank, and can vary widely between different styles and brands. Even different colors of the same style can have different press instructions.
- Within each brand, different HTV styles have different press instructions. E.g., Siser Glitter gets pressed at 320ºF but Siser Sparkle gets pressed at 305ºF
- Similar HTV from different brands will have different press instructions. Siser Easy Puff and WALAKut Puff vinyl are both puff HTV, but Siser Easy Puff presses at 280ºF, while WALAKut Puff is pressed at 305ºF
- Sometimes there are even different instructions for specific colors of the same type of HTV. WALAKut Puff white and silver get pressed at 290ºF, and pink and lilac get pressed at 275ºF
If you aren’t sure about where to find the instructions from the manufacturer, Heat Transfer Warehouse includes a very helpful tag on every sheet and roll of vinyl they sell. It includes temperature, time, pressure, and peel temperature.
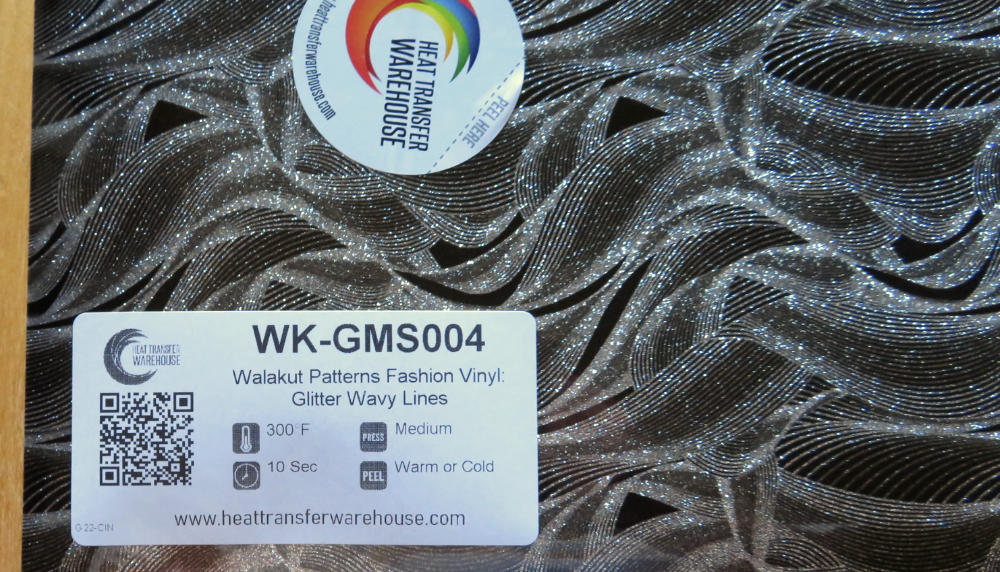
Closeup of the application instruction label on a roll of WALAKut HTV
#2. Not Matching your HTV to your fabric/blank
Another common mistake made by garment decorators is mismatching the HTV and the blank. Speaking strictly about apparel, most HTV will be compatible with cotton, polyester and blends, but there are some types of fabrics that only cooperate with certain types of HTV.
For instance, fabrics with a low application temperature shouldn’t be matched with a high temperature HTV. For example, Siser glitter HTV has an application temperature of 320ºF, and should probably not be paired with a lightweight polyester blend that is rated for low heat. You run the risk of scorching your garment by applying a heat that it cannot withstand. Check the laundry tag symbol to figure out how much heat is safe for your garment.
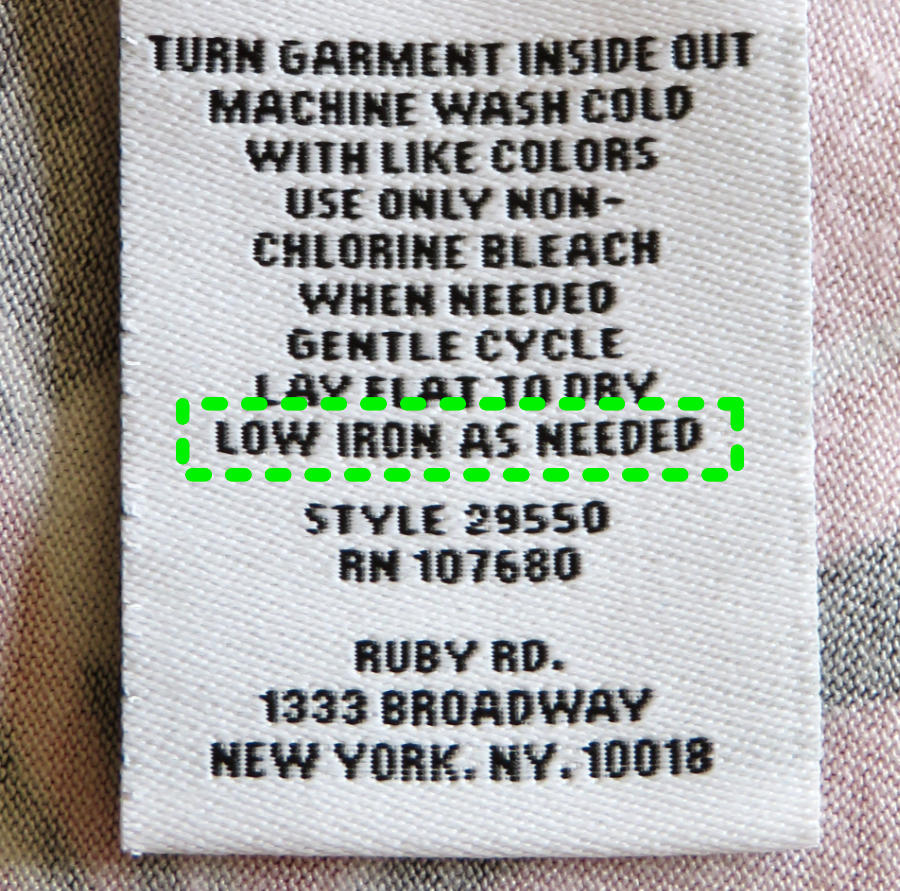
Closeup of laundry tag indicating low ironing temperature for garment
For the best results, pair stiffer, thicker HTVs like flock, glitter and holographic with thicker base fabrics like 100% cotton shirts, athletic fleece hoodies and canvas bags. Match lightweight fabrics with thinner and more flexible films (with lower application temperatures) like WALAKut Soft, Siser EcoStretch or Sparkle, or ThermoFlex (POLI-FLEX) Turbo Low Temp.
Some fabrics, like nylon, can ONLY be paired with specific types of HTV designed for that fabric. Not many types of HTV bond to nylon, but Heat Transfer Warehouse carries all the major types that do:
- Chemica Hotmark Revolution Low Temp
- Siser EasyWeed Extra
- ThermoFlex Xtra
- POLI-FLEX (ThermoFlex) Turbo Low Temp - this also comes in neons and metallics
#3. Not using enough pressure
Although it is possible to overpress HTV and ruin the adhesive (the adhesive will be seen as a halo leaking out from under the vinyl), most people have a tendency to under-press in terms of applying pressure. This is particularly true if you are using a home iron or a single platen craft press like the Cricut EasyPress.
You will find pressure recommendations included in the manufacturer’s instructions. Some HTV – like Siser Stretch – takes a lot of pressure to properly adhere to a fabric base. HTV requiring firm/extra firm pressure should be pressed with a heat press machine for best results, not an EasyPress.
If you find your HTV lifting after you wash a garment, the #1 reason is that you didn’t use enough pressure.
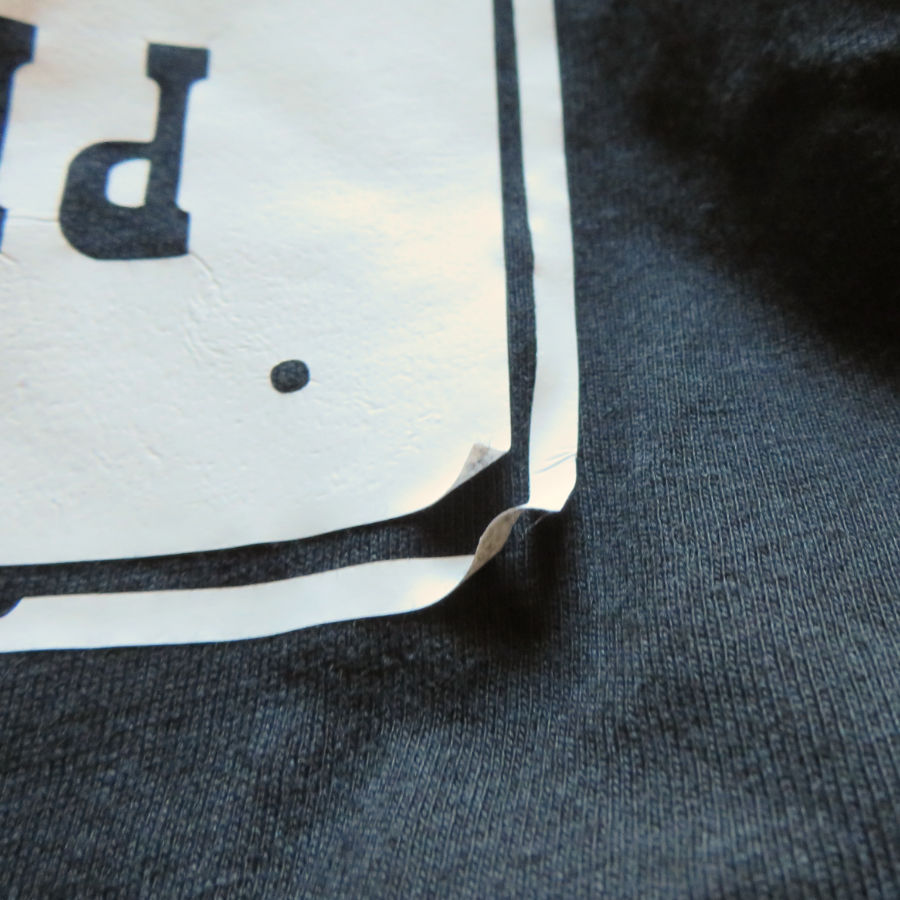
Closeup of Siser Stretch HTV peeling up after washing. Not enough pressure was used during application to create a good bond
If you are using a heat press and are unsure of how to set “medium” or “firm” pressure, get a sheet of paper (or dollar bill) and close the press on it (with half of the paper sticking out the front). If you can pull the sheet of paper out, increase the pressure. Repeat this test on the left and right side of the press. Once the paper is held firmly by the press, consider that the “medium” pressure baseline. Make adjustments for HTV requiring heavy or lighter pressure by making manual adjustments to the pressure knob.
#4. Layering HTV incorrectly
Layering HTV takes some forethought and if you don’t have a plan for your layers, your project can go off the rails.
Planning your layers helps you ensure that every layer gets enough heat to be properly bonded. Take Siser EasyWeed for example. It is recommended that it get a 10 to 15 second press, but if you are pressing multiple layers, it is the cumulative press time that matters.
If you are pressing a 4 layer design, you would not press each layer 10-15 seconds and then move on to the next layer.
EasyWeed has a trademark 1 second tack time for layering. For each of the different layers, you can press the first layer for one second, peel the carrier, apply the second layer for 1 second, peel, and then apply the final layer for 10 seconds and every layer will have gotten enough heat.
- Layer 1: (1 sec) + (1 sec) + (1 sec) + (10 sec) = 13 seconds
- Layer 2: (1 sec) + (1 sec) + (10 sec) = 12 seconds
- Layer 3:(1 sec) + (10 sec) = 11 seconds
- Layer 4: (10 sec) = 10 seconds
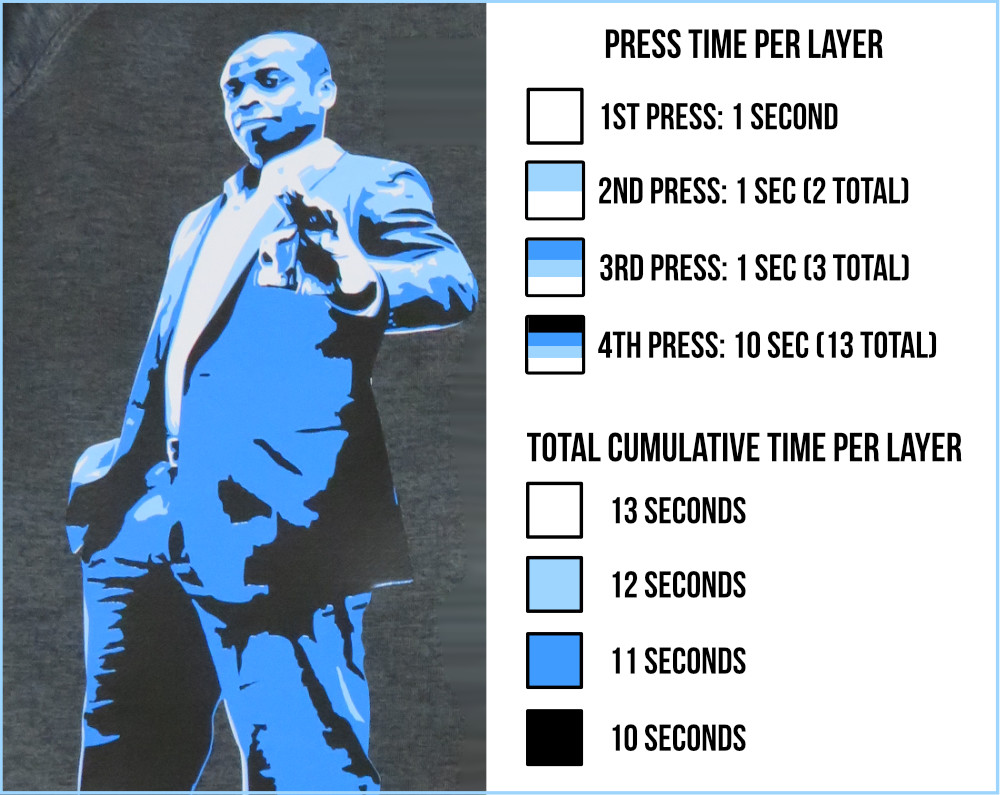
Breakdown of cumulative press time on a 4 layer Siser EasyWeed design
To avoid carrier sheet marks on your fabric, just press your final layer enough to tack it down, remove the carrier sheet, then re-press under a teflon sheet for the full press time. Of course, this doesn’t apply to final layers with specialty finishes (e.g. puff), many of which can’t be pressed more than once.
Other tips for Layering HTV: Layer Higher temp vinyl first
If you are layering different brands of HTV, like WALAKut Express and ThermoFlex Plus, you should take into account the different application temperatures. For example, WK Express presses at a much lower temperature range (250-305ºF) and shorter press time (5s) than ThermoFlex Plus (320-330ºF, 15s) so WK Express should be the top layer.
Similarly, there are many types of HTV that must be top layer only. Siser EasyWeed, WALAKut Express and ThermoFlex Plus are examples of HTV that can be base layers and top layers, but HTV like WALAKut Metallic, Siser Holographic or glitter HTV of any brand cannot have other HTV layered on top of it.
Going a step further, HTV like puff must be the last vinyl you press! There are certain varieties of HTV that can only be pressed once for your project. Puff is the most obvious example, as multiple presses can deflate it.
#5. Peeling carriers at the wrong temperature
This mistake can feel like a real kick in the teeth, because it comes at the moment of truth when you are about to finish, and then you peel HTV hot that’s supposed to be peeled cold and you end up messing up the finish or peeling up the vinyl and your whole project feels like a disappointment.
This mistake is related to properly reading the pressing instructions, but I think it deserves its own section because peel temperature is often overlooked when people talk about time, temperature, and pressure.
If HTV is labeled “hot or cold” peel (like EasyWeed), there’s no point in waiting until it’s cold. Peel it hot and get on with your day. But with HTV like Siser Holographic or Siser Metal or other HTV that has a special finish, labeled “cold peel,” definitely take your time and wait until the carrier sheet is cool, because peeling it too soon can mess up the finish or cause the corner to peel up.
(If you’re in a hurry, you can speed up the cooling process by rubbing your HTV on your table/work surface. You can also rub a glass or acrylic block over the HTV to dissipate the heat faster)
Here’s a look at Siser Holographic HTV peeled cold vs peeled hot. The hot peeled sample has a pitted finish, but the cold peeled sample has a perfect, smooth finish.
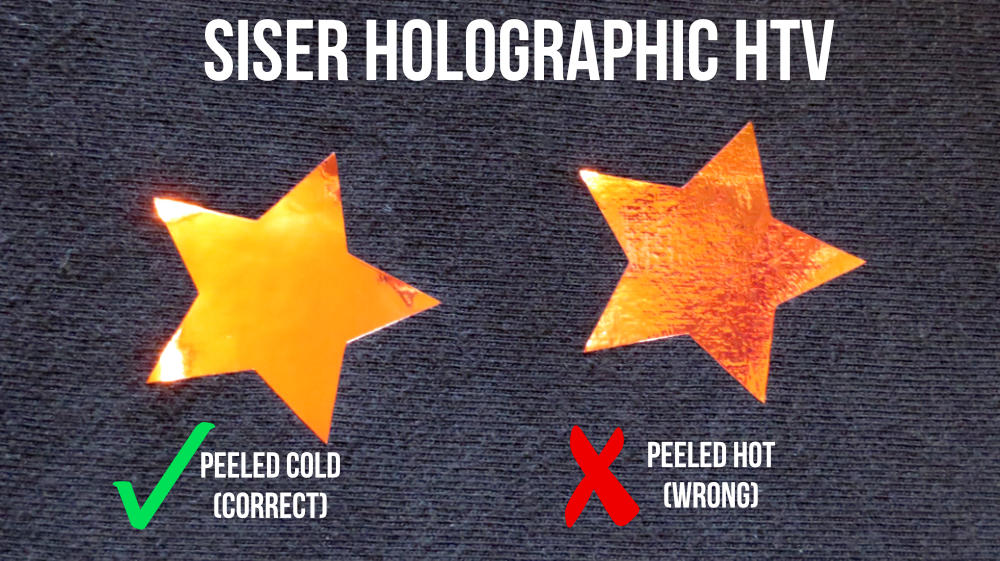
Siser Holographic HTV peeled cold vs peeled hot
Other Common mistakes to avoid when working with HTV
Before you cut:
- Forgetting to mirror your design. Make sure you set your cutting software to cut in reverse when you are using HTV.
- Making your design too big or too small for your base. Make sure you’ve got the proportions right before you cut!
Before you press:
- Pre washing your garment with fabric softener. Using fabric softener on your shirt before you press can prevent the HTV from bonding properly, Skip the wash (and definitely don’t wash if you’re selling the item!) or launder it without softener.
- Forgetting to prep your garment before you press. Make sure you use a lint roller to remove any stray dust, lint or hair from your base fabric, and pre-press your garment to remove any wrinkles or residual moisture from the fabric. (If you live in a really humid climate, pay extra attention to the pre-press to get all of the moisture out of your fabric, especially heavy cotton).
- Mis-aligning your HTV on the garment. If you’re making a t-shirt or hoodie, make sure you are getting your design centered and placed the correct distance from the neckline. Great artwork and flawless layering can’t make someone overlook an off-center or awkwardly placed design on a shirt.
While you’re pressing:
- Forgetting your cover sheet. It’s important to protect your heat press, your vinyl and your garment during the project, so always use a teflon or parchment sheet over your HTV while you’re pressing (unless instructed otherwise).
- Another note on cover sheets: some HTV, especially from Specialty Materials, specify particular cover sheets. Make sure you read the instructions and take note if you should use teflon, silicone, or parchment as a cover sheet. (ThermoFlex Turbo Brights is one example of HTV that should be re-pressed under silicone.)
After you press:
- Ignoring the wash instructions. After you’re finished, you should wait 24 hours before washing your garment so the adhesive can cure. If you wash too soon, the HTV can peel. Follow the manufacturer’s care instructions.
- If you are making an HTV t-shirt as a gift or for sale, it’s always helpful to include washing care instructions for the recipient.
Final Thoughts
After all of this talk of mistakes and pitfalls of using HTV, you might have forgotten that working with HTV is mostly straightforward, easy to use and a lot of fun! Just because something can go wrong doesn’t mean it will go wrong, and if you spend a little time preparing and practicing before you start using HTV, you’ll have stress-free time and get great results!
About the author:
Ian Potter blogs about vinyl and design at Sniptoit.com.